Your Cart is Empty


Forging and Casting Update: Initial Casting Process and Results
If you've been following along (or even if you haven't ) we thought it would be a good idea to give you an update on where we're currently at with our forging and casting expansion. One of our big goals this year at Anvil Customs is to develop a more robust catalog of hardgoods. First, you might be asking, "Anvil you already do so much, why the heck would you want to do that too?" The answer is pretty straightforward. This allows us a more reliable and consistent access to these types of hardgoods without having to depend on external sources. Outsourcing this type of thing can be expensive in the long haul (especially for the pace at which we develop and advance the catalog around here.) Additionally, keeping it in house means we have a consistent result. Side note: It is also fun. And we like to have fun around here. Never underestimate the value of coming to work every day getting to do the things you enjoy. But with all that said... back to the progress!
We had a brief but important conversation here at the shop when we were discussing how to handle the metal goods expansion. Naturally we want to preserve the classic approaches to every aspect of the creative process as possible. The thought of 3D printing objects as opposed to carving, hammering, forging and casting each one was one that we didn't take lightly. But the reality of the situation is this. Even though we're using modern methods to produce our hardware on a scale that is feasible for us as a business it beats the pants off of ordering generic hardware from presumably overseas. Anything we can make in house we should. It's more true to the brand, and it brings a genuine pride to that product that we know we constructed almost every conceivable facet of. (We'll be tanning hides one day too at this point!)
Currently we use an incredibly robust open source 3D modeling software called Blender to construct models of our products. It's free, and it does just about anything a person would want to do with 3D work.

This 3D model was constructed in Blender by me (Nathen) after specifications given from Ryan. It went through a couple different iterations before this finished version. Specifically this is an object we're calling a belt charm. It's effectively a bit of decorative flare for your Anvil Belt.

Here's that same belt charm mocked up with a silver surface, to give us an approximation of what it will look like when it is finished.

This is the first version of the belt charm cast in sterling silver. As you can tell we're still getting the kinks out of our process. The surface is gritty and not up to par with what our expectations are. But if you're familiar with the creative process you'll know that it usually takes several iterations before prototypes move into production models. It is a learning process after all.

This is an example of a 3D Print file. We currently print using the Form 3 from Formlabs, which is one of the large pieces of equipment we're currently running our pre-sale fundraiser to purchase. The 3D Printer takes the models and suspends a build platform upside down in a pool of resin. Slowly, layer by layer, the build platform is raised out of the pool of resin. A laser hardens the resin on the platform from beneath the pool. Once one layer is hardened the build platform raises by about 25-50 microns (less than the thickness of a sheet of printer paper!) and the laser cures another layer of resin. So on and so forth until the entire file is printed. The process takes anywhere from a few hours to more than a day depending on the complexity of the file. That may sound like a lot, but it beats the sometimes weeks wait that you'll have to deal with when outsourcing casting.

Once the file is printed our object has to be cleaned of any supports. These supports help the model stay structurally sound during the print process. Originally we printed using the Wax 40 (blue) which consists of 40% wax/resin mixture. While the Wax 40 performs more in line with how lost wax casting is typically done, we found that it wasn't exactly as crisp as our needs were. Since our initial prints we have switched over to the Cast Wax v1 (purple) from Formlabs. This different material contains more resin which means the prints actually come out crisper and tougher in a green state. The casting process is a little slower with your temperatures and such, but we're hoping that we'll end up with a final product that has better, more refined details.

Once the wax model is printed and cleaned up it's on to the casting process. Much in the same way that the leather studio started out in a garage in Ryan's house, so too has the metal studio begun to form. You can see in the image above that we're still working on perfecting the casting side of the operation, but we've had some very promising results. Be sure to follow the RyanTheAnvil Instagram account where you can watch Ryan cast things live and catch real-time progress happen!

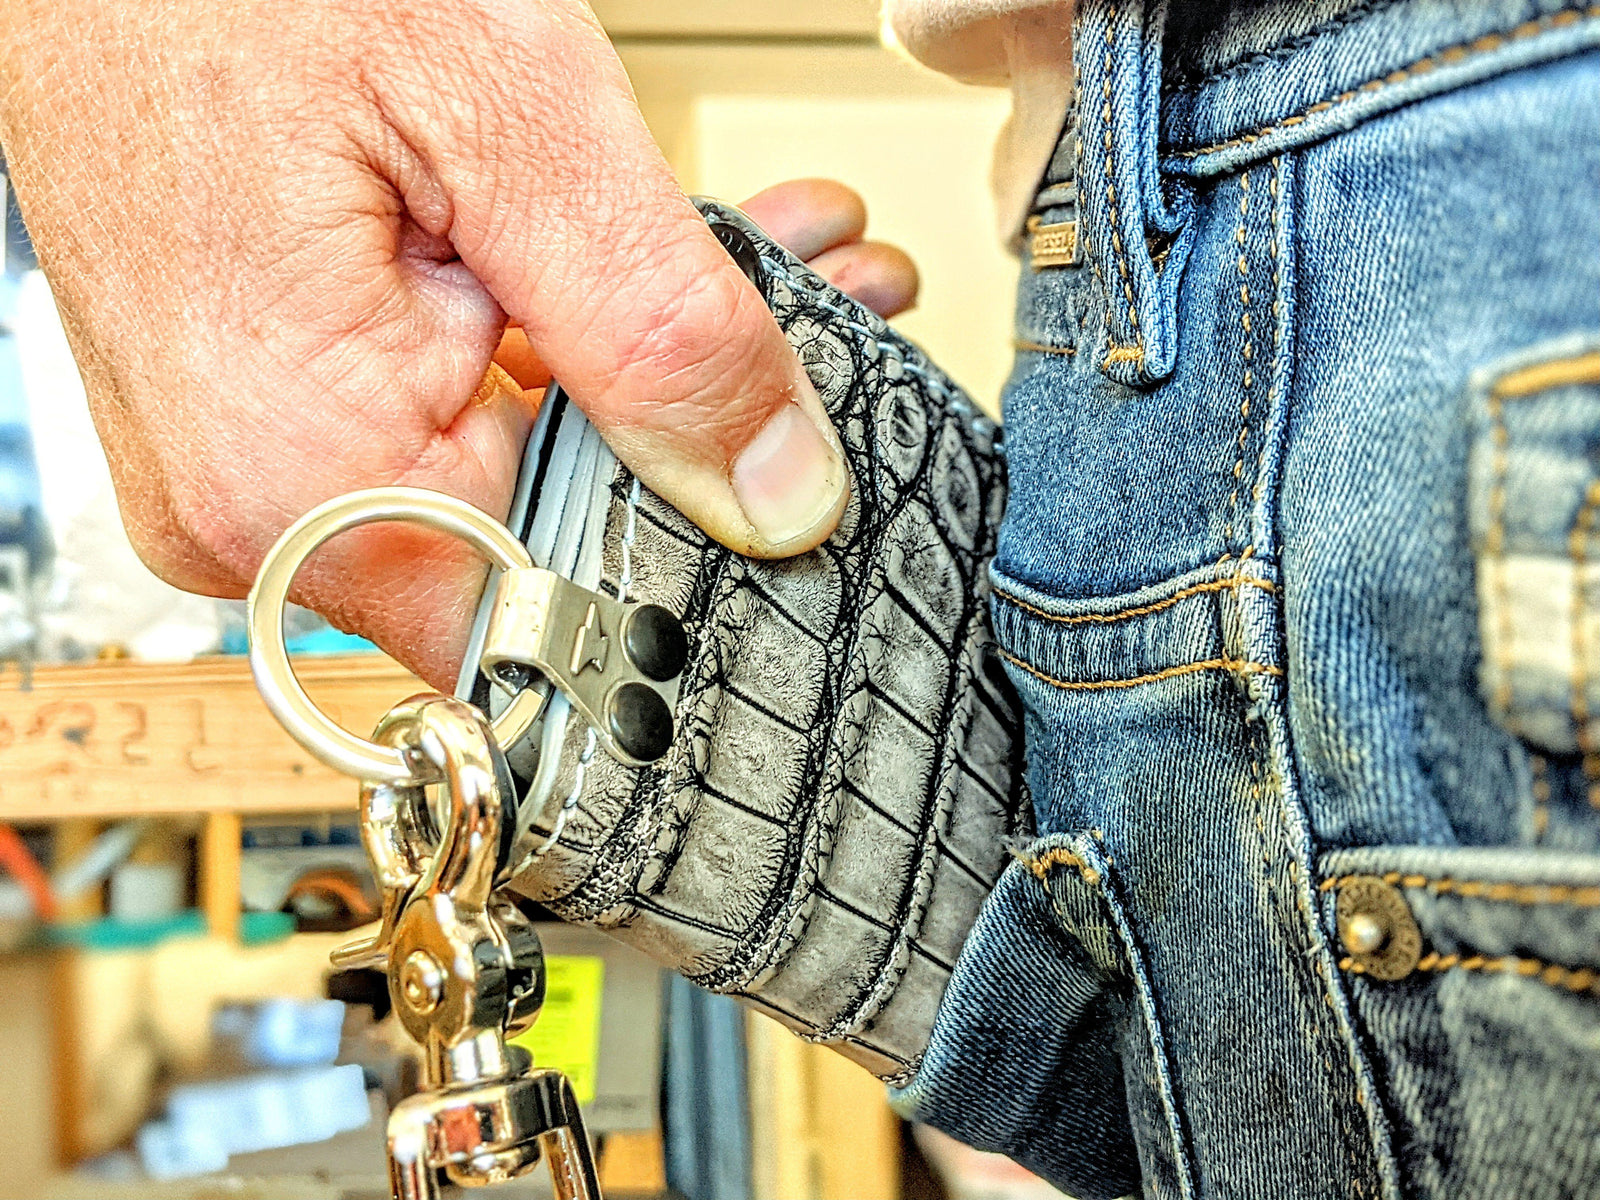
This cast silver chain attachment was installed and sent out to a customer for trial purposes. Down the road they'll have shiny rivets, and be an optional upgrade on a selection of wallets across the website.

Not all casts make the quality cut. Anything deemed less than our expectations gets melted down so that the precious metal can be used again. But there's no sour feelings here. It's all about perfecting the craft.
We'll go over the casting process more in depth in an upcoming update. But for now you should head on over to the Forging and Casting Fundraiser to find out how you can help us invest in this expansion all while getting your hands on some awesome backer benefits! Thanks for following along!